“Interactive HTML5 Map” Documentation by “LGLab” v1.0
Interactive HTML5 Map
Created: 08/12/2011
By: LGLab
www.freehtml5maps.com
Table of Contents
- Installation
- Changing the size of the map
- General settings
- Side text option
- Default side text
- Individual state settings
A) Installation - top
To add the map to your website, open the index.html for the version you have chosen, and start by importing the fonts.css and map.css withing the head tag of your site:

Then import all the js files within the head tag as well:

Make sure to also copy and paste all these files in your website directory keeping the same structure relative to the page you want to load the map into.
Finally copy/paste the mapWrapper div and its content where you want to include the map on your page:

B) Changing the size of the map - top
The map's original dimensions are set in the init.js file around line 25 as shown below, they are different for each map so make sure to check that:
var originW = 900;
var originH = 440;
Try to keep as close to this ratio when resizing the map. To change the size open the settings.xml file located in the xml folder, and at the top adjust the width and height to your desired ones.
C) General settings - top
If you wish to disable some of the states, you can choose a different color for those by adjusting the offColor parameter in the xml file:

You can change the stroke color for the map by adjusting the strokeColor parameter with your color:

D) Side text option - top
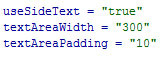
The simple version of the map navigates to an external URL when a state is clicked, you can however chose to display some text in a side bar instead, to do so set the useSideText parameter to true and adjust the textAreaWidth and textAreaPadding parameters accordingly:
E) Default side text - top
If you choose to use the version with the text, you can set a default text content when the map first loads before a user clicks any state. To do so update the text content within the CDATA of the defaultSideText node:

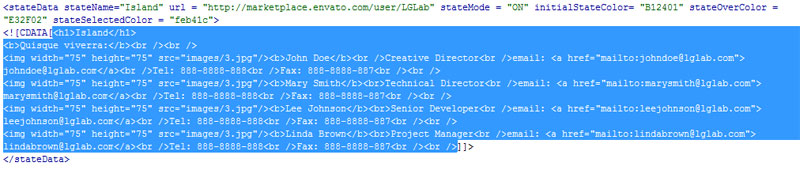
E) Individual state settings - top
In the xml file, each state is defined within a stateData node, everything within each of these tags belongs to that state. The first part of the stateData nodes include parameters for that particular state which you can adjust:

stateName: The text that will appear in the tooltip.
url: The URL to navigate to when a state is clicked in the simple version.
stateMode: Determines if that state is active or not, set to OFF to disable a state.
initialStateColor: The default color for that state.
stateOverColor: The color for that state when the user mouses over it.
stateSelectedColor: The color for that state when the user has clicked it.
Finally for each state, if you have chosen the version of the map with side text, you can change that text for each province within the CDATA of each provinceData tag: